
This build log will be for the re-released Estes Black Brant II (#7423). I’ve seen some very nice-looking scale builds of this model of the Canadian built sounding rocket. I won’t be going for a scale build, my focus will be more on making this a durable sport flyer. The goal will be to have an attractive-enough looking model that’ll look great in the air and on the flight line, and hopefully be tough enough to survive many launches and potential rough landings. Any place I deviate from the “stock” build will be to either make the build process a little easier or to increase durability, as I hope to put many motors through this model. If it’s a little heavy, fine by me … I like slow launches and lower flights as much as I enjoy sending one 1/4 mile high once in a while. With the range of motors you could fly this rocket on, either objective is definitely a possibility.
Sadly, I neglected to take photos of the two “unique” parts of this build. The motor mount and boat tail, and the antennae. However, Chris Michielssen covers these details nicely in his build log for this model, which he built for Estes. Definitely a “gold standard” build.
The motor mount/boat tail assembly requires that you make three cuts from the blow molded “tail cone” (as they call it). The instructions suggest using a hobby knife for this step. Personally, I thought it’d be a bit tedious to make these cuts in the relatively thick plastic with a knife. Instead I used a sharp razor saw which allowed me to make the required cuts quickly, accurately and cleanly.
Once the cuts are made, and the edges cleaned up a bit, assembly of the motor mount is fairly simple. The only “fiddly” part I encountered is getting the motor tube centered in the boat tail. I’d recommend using an adhesive that will give you a little working time so you can manipulate the tube into the correct orientation before it grabs tight. Once assembled, I found it necessary to sand the motor opening in the boat tail a bit to open it up enough to allow a 24mm motor casing to slide in.
I do wish this model incorporated some sort of motor retention … I’d prefer not to rely on friction fit and/or taping the motor in place. It’d be awesome if someone could 3D print a boat tail similar to the Schrockets by Apogee Ibis which incorporates a slot to allow the use of a spring steel motor hook.
The nose cone build-up is pretty straight-forward. The only real deviation I made from the manual here had to do with the installation of the three “antennae”. The kit provides 3 plastic toothpicks that you cut down to 2″ each. The instructions say you should use a hobby knife to drill out three holes for the toothpicks to go through the body tube. I used a 1/16″ drillbit instead, after having made a small centering hole with the hobby-knife to keep the bit from wandering. I just wrapped some tape around the shank end of the bit and spun it with my fingers to get 3 perfectly sized, clean holes. The instructions also show the butt-ends of the toothpicks meeting at the aft end of the blow-molded nose cone. I found that is really not possible, as the end of the nose cone is too far away to make contact and have the antennae at a “pleasing” swept-back angle. Instead, I had the three antennae meet in open space, and then quickly tacked them with thick CA. Once I was pleased with the installation, I added a blob of epoxy at the meeting point, and on the inside of the body tube where each toothpick passes through.
For the fins, rather than profile them with those beautiful scale knife-edge profiles, I’ve gone for a more rounded airfoil shape. The kit directions show profiling patterns for the “scale” profile with the knife-edge leading and trailing edges, as well a “sport” with just the leading edge beveled. I’m not going to try and go supersonic, and the rounded profile will be more appropriate for slower flights and a bit more rugged than the thinner beveled profile. I’ve also opted to leave the trailing edges square as they project beyond the bottom of the body tube. This should help them survive bumpy landings a little better. Should you decide to go for the chiseled profiles, I’d suggest a good sanding block and a jig to hold a consistent angle.

Once the motor mount is inserted, attaching the fins is a breeze. The laser cutting is perfect, and the aft end of the fin root is cut to match the angle of the boat tail. All you need to do is make sure it’s in firm contact with the boat tail and body tube, and you’re guaranteed to have perfect fore-aft alignment of all 3 fins. One less dimension to worry about, so you can focus on just mounting them plumb and square to the body tube. Additionally the 5/16″ balsa provides a very wide contact surface for glueing, so the fins should be very well bonded. It did take a few passes with the hobby knife to get them out of the sheet though, I think they could’ve turned the power up on the laser just a tad for this thicker material.
After the fins were sanded and shaped, I use Titebond thinned with water and painted all surfaces except the root edge with the thinned glue. I make sure to seal the end grain on the fin tip with a couple of coats so it’ll take paint well, but I avoid sealing the end grain on the root edge to allow for glue penetration into the fibers and a stronger bond when attaching them to the body tube. On thinner stock, it’s definitely a good idea to do both sides of the fin at once to prevent warping. Probably not as much of an issue here with these beefy fins, but I still do it as a matter of habit. Once dry, a quick pass with some 180 grit paper and the grainlines will be mostly filled. Any remaining grain will be easily dealt with during paint prep with CWP and/or filler primer.
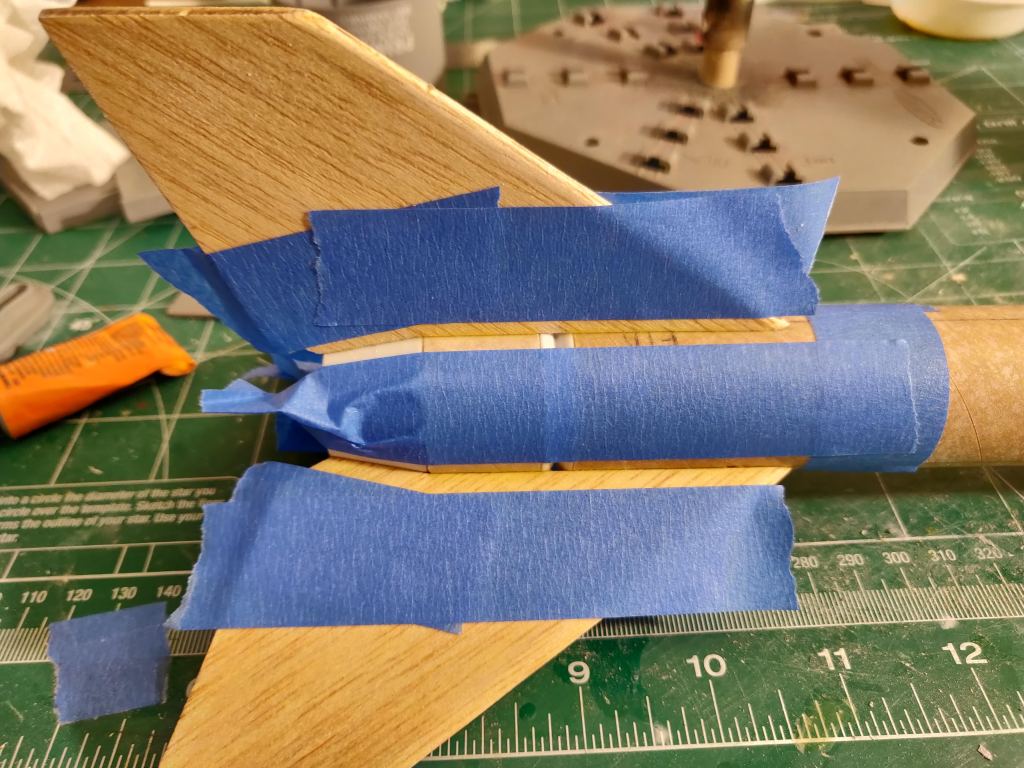

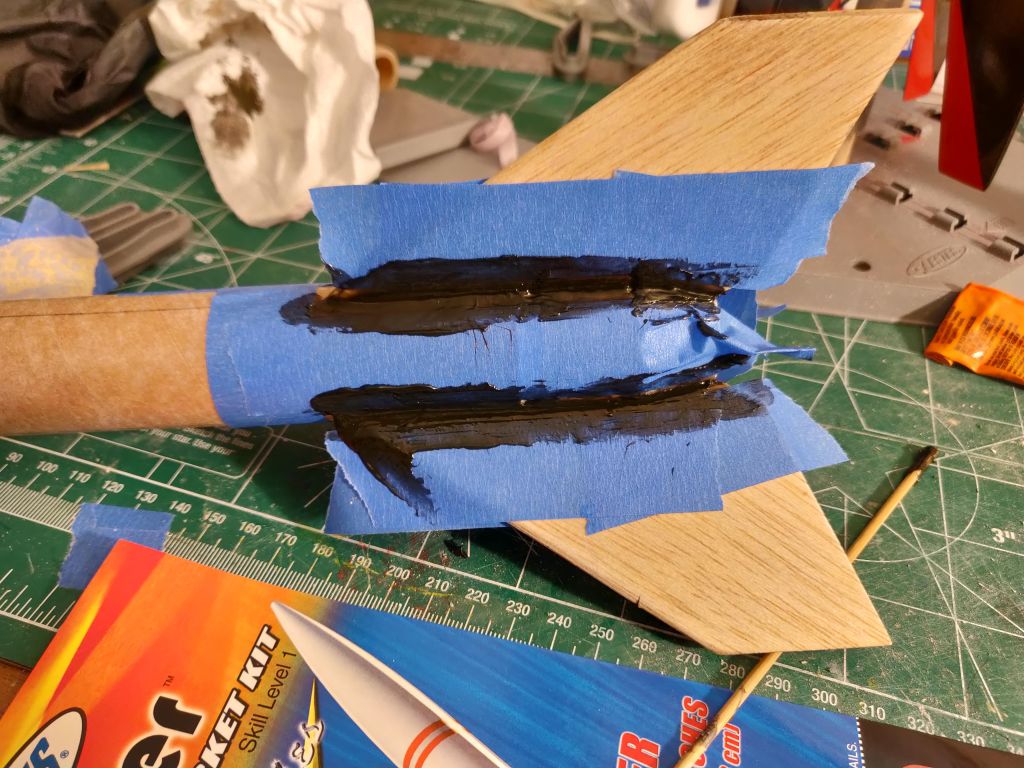


I glued and filleted the fins with Titebond, let them fully dry, then came back and added epoxy fillets. The fins on this rocket extend beyond the end of the body tube, so will be taking impact forces on landing. The epoxy fillets should further reinforce the fin attachment, as well as be visually appealing and provide some modest aerodynamic benefits. I first tried employing epoxy fillets on the Bertha’s Breech Baby build, in which I learned that masking first with blue painter’s tape allows you to get very neat fillets very easily.
I used Gorilla Weld Steel Bond epoxy for the fin fillets, which has a 10-minute cure time. Working time is probably 5 minutes or so, so I’d only mix enough to do two fillets at a time. I globbed the epoxy into the fin joint, making sure there was more material than I needed for the final fillet. Then, starting from the middle and using a gloved finger wetted with isopropyl alcohol, smooth the fillet first one direction and then the other; not cleaning the excess off of my finger tip until I’m satisfied with the whole fillet. If you are dissatisfied with the result, just glob on more epoxy and re-pull the whole fillet rather than try and patch things up. I do recommend removing the masking tape before the epoxy cures to prevent it getting glued in place. I removed the tape from each fillet as soon as I finished pulling. This will leave a slightly raised edge at the fin root and body tube which will be easy to sand and/or fill and blend once the epoxy cures.
Once the epoxy hardens enough to sand, but before it’s fully cured, I hit the fillets lightly with some 180 grit paper to take down any high spots. I’ll then use some CWP to further blend and smooth the fillets and sand again with 400 grit. CWP dries quickly and sands very easily, so this is a pretty quick step.

Finally, I added the launch lugs. The provided lugs are 3/16″, which requires the Maxi Launch Rod. I’ve personally got a Porta-Pad II with a 1/8″ rod , and a Porta-Pad E with a 1/4″ rod. The last thing I need is a third launch lug size in my fleet, so I swapped out the provided lugs with 1/4″ lugs from Apogee. I used some thick CA to attach the lugs, and then added fillets to strengthen and blend them into the airframe using FIXIT epoxy clay. This material has a ~3 hour cure time, and molds just like clay. It’s very easy to smooth and blend it to a feather edge with a finger wetted with isopropyl alcohol. I may try using this products for fin fillets in the future, but it’ll definitely be a more time-consuming method than using a more fluid type of epoxy. I’ve been finding this stuff a very handy addition to my build bench, and have found it useful for many different applications.
